MyBatis-Plus
简介
MyBatis-Plus是一个MyBatis的增强工具,在MyBatis的基础上只做增强不做改变,为简化开发、提高效率而生。MyBatis-Plus提供了通用的mapper和service,可以在不编写任何SQL语句的情况下,快速的实现对单表的CRUD、批量、逻辑删除、分页等操作。
框架结构
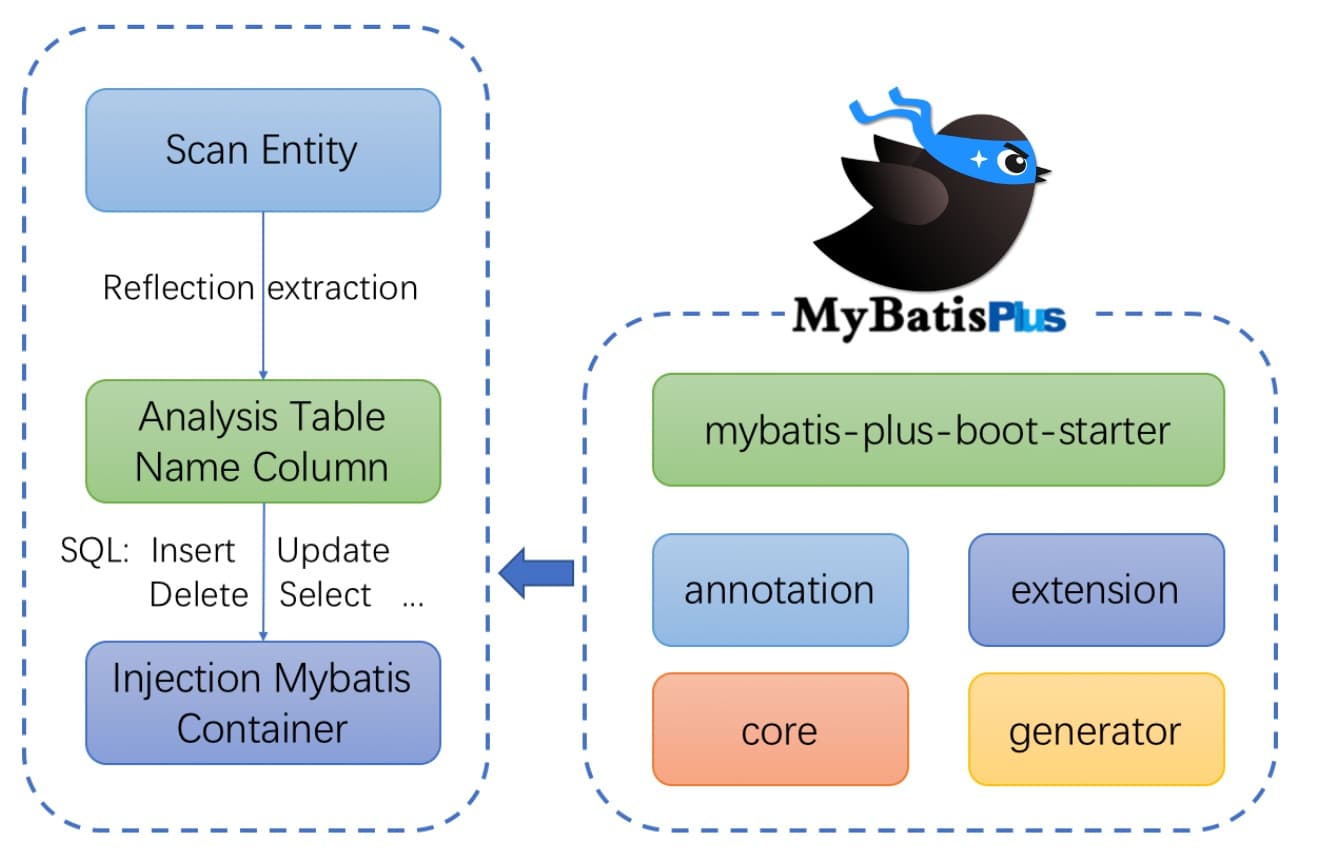
特性
- 无侵入:只做增强不做改变,引入它不会对现有工程产生影响,如丝般顺滑
- 损耗小:启动即会自动注入基本 CURD,性能基本无损耗,直接面向对象操作
- 强大的 CRUD 操作:内置通用 Mapper、通用 Service,仅仅通过少量配置即可实现单表大部分 CRUD 操作,更有强大的条件构造器,满足各类使用需求
- 支持 Lambda 形式调用:通过 Lambda 表达式,方便的编写各类查询条件,无需再担心字段写错
- 支持主键自动生成:支持多达 4 种主键策略(内含分布式唯一 ID 生成器 - Sequence),可自由配置,完美解决主键问题
- 支持 ActiveRecord 模式:支持 ActiveRecord 形式调用,实体类只需继承 Model 类即可进行强大的 CRUD 操作
- 支持自定义全局通用操作:支持全局通用方法注入( Write once, use anywhere )
- 内置代码生成器:采用代码或者 Maven 插件可快速生成 Mapper 、 Model 、 Service 、 Controller 层代码,支持模板引擎,更有超多自定义配置等您来使用
- 内置分页插件:基于 MyBatis 物理分页,开发者无需关心具体操作,配置好插件之后,写分页等同于普通 List 查询
- 分页插件支持多种数据库:支持 MySQL、MariaDB、Oracle、DB2、H2、HSQL、SQLite、Postgre、SQLServer 等多种数据库
- 内置性能分析插件:可输出 SQL 语句以及其执行时间,建议开发测试时启用该功能,能快速揪出慢查询
- 内置全局拦截插件:提供全表 delete 、 update 操作智能分析阻断,也可自定义拦截规则,预防误操作
一个案例
1、创建数据库和表
2、创建SpringBoot工程
初始化工程
引入依赖
1
2
3
4
5
6
7
8
9
10
11
12
13
14
15
16
17
18
19
20
21
22
23
24
25
26
27
28
29
30
31
32<dependencies>
<dependency>
<groupId>org.springframework.boot</groupId>
<artifactId>spring-boot-starter</artifactId>
</dependency>
<dependency>
<groupId>org.springframework.boot</groupId>
<artifactId>spring-boot-starter-test</artifactId>
<scope>test</scope>
</dependency>
<!-- mysql驱动 -->
<dependency>
<groupId>mysql</groupId>
<artifactId>mysql-connector-java</artifactId>
<version>8.0.29</version>
</dependency>
<!-- mybatis-plus启动器 -->
<dependency>
<groupId>com.baomidou</groupId>
<artifactId>mybatis-plus-boot-starter</artifactId>
<version>3.5.1</version>
</dependency>
<!-- lombok用于简化实体类开发 -->
<dependency>
<groupId>org.projectlombok</groupId>
<artifactId>lombok</artifactId>
<optional>true</optional>
</dependency>
</dependencies>安装lombok插件
配置application.yml
1
2
3
4
5
6
7
8
9
10
11
12
13
14
15
16
17
18
19
20
21
22
23
spring:
# 配置数据源
datasource:
type: com.zaxxer.hikari.HikariDataSource
driver-class-name: com.mysql.cj.jdbc.Driver
url: jdbc:mysql://localhost:3306/mybatis_plus?serverTimezone=GMT%2B8&characterEncoding=utf-8&useSSL=false
username: root
password: 123456
# 日志配置
mybatis-plus:
configuration:
log-impl: org.apache.ibatis.logging.stdout.StdOutImpl
# 自定义mapper路径,默认是classpath*:/mapper/**/*.xml
# mapper-locations:
# global-config:
# db-config:
# # 设置所有表的固定前缀
# table-prefix: t_
# 全局配置id生成策略
# id-type: auto
# 设置类型别名
type-aliases-package: com.zephon.mybatisplus.mybatisplus.pojo
3、编写代码
实体类
1
2
3
4
5
6
7
8
9
10
11
12
13
14
15
//@NoArgsConstructor
//@AllArgsConstructor
//@Getter
//@Setter
//@EqualsAndHashCode
//@ToString
public class User {
private Long id;
private String name;
private Integer age;
private String email;
}Mapper类
1
2
public interface UserMapper extends BaseMapper<User> {
}配置扫描
1
2
3
4
5
6
7
8
// 扫描mapper接口所在的包
public class MybatisPlusApplication {
public static void main(String[] args) {
SpringApplication.run(MybatisPlusApplication.class, args);
}
}测试
1
2
3
4
5
6
7
8
9
10
11
public class MyBatisPlusTest {
private UserMapper userMapper;
public void testSelectList(){
// 通过条件构造器查询,如果没有条件则可设置为null表示查询所有
List<User> userList = userMapper.selectList(null);
userList.forEach(System.out::println);
}
}
通用Mapper:BaseMapper
新增功能
1 |
|
删除功能
1 |
|
修改功能
1 |
|
查询功能
1 |
|
自定义功能
1 |
|
1 |
|
通用Service:IService
创建接口和类
1
2public interface UserService extends IService<User> {
}1
2
3
public class UserServiceImpl extends ServiceImpl<UserMapper, User> implements UserService {
}测试
1
2
3
4
5
6
7
8
9
10
11
12
13
14
15
16
17
18
public class MyBatisPlusServiceTest {
public UserService userService;
public void testGetCount(){
long count = userService.count();
System.out.println("总记录数:" + count);
}
public void testInsertMany(){
List<User> list = new ArrayList<>();
list.add(new User(null, "张三", 20, "zhangsan@gmail.com"));
list.add(new User(null, "李四", 22, "lisi@gmail.com"));
boolean result = userService.saveBatch(list);
System.out.println("result:" + result);
}
}
常用注解
- @TableName:用于实体类上,设置实体类对应的数据库中表的名称
- value:表的名称
- @TableId:用于类的属性上,将所属性所对应的字段指定为主键
- value:属性对应表中的列名,指定主键的字段
- type:指定主键生成策略,默认是雪花算法
- IdType.ASSIGN_ID:基于雪花算法算成ID,与数据库是否设置自增无关
- IdType.AUTO:使用数据库自增策略,需确保数据库设置了id自增,否则无效
- @TableFiled:用于类的属性上,设置属性对应数据库中的字段
- value:字段名称
- @TableLogic:用于类的属性上,表示为逻辑删除字段,之后的删除操作都只会将对应的字段修改,而不会真正的物理删除,查询时也只会查询对应字段表示未删除的数据(如:is_deleted=0)
- @Version: 标识乐观锁版本号字段,配合乐观锁插件使用
- @EnumValue: 将注解所标识的属性的值存储到数据库中
条件构造器
Wrapper介绍

- Wrapper:条件构造抽象类,最顶端父类
- AbstractWrapper:用于查询条件封装,生成SQL的where条件
- QueryWrapper:查询条件封装
- UpdateWrapper:update条件封装
- AbstractLambdaWrapper:使用Lambda语法
- LambdaQueryWrapper:用于Lambda语法使用的查询Wrapper
- LambdaUpdateWrapper:用于Lambda更新封装Wrapper
- AbstractWrapper:用于查询条件封装,生成SQL的where条件
QueryWrapper
1、组装查询条件
1 | // 查询用户名包含a,年龄在20~30,邮箱信息不为null的用户 |
2、组装排序条件
1 | // 查询用户信息,按年龄降序排序,若年龄相同则按id升序排序 |
3、组装删除条件
1 | // 删除邮箱地址为null的数据 |
4、条件的优先级
1 | // 将(年龄大于20且用户名中包含有a的)或邮箱为null的用户名修改成小明,邮箱修改为test@test.com |
1 | // 将用户名中包含有a且(年龄大于20或邮箱为null)的用户名修改为小红 |
5、组装select子句
1 | // 查询用户的用户名、年龄和邮箱 |
6、实现子查询
1 | // 使用子查询查询id小于等于100的用户信息 |
UpdateWrapper
1 | // 将用户名中包含有a且(年龄大于20或邮箱为null)的用户名修改为小红 |
condition
通过自行判断
1
2
3
4
5
6
7
8
9
10
11
12
13
14
15
16// String name="";
// Integer ageBegin = 20;
// Integer ageEnd = 30;
// 模拟开发中组装条件的情况
QueryWrapper<User> queryWrapper = new QueryWrapper<>();
if(StringUtils.isNotBlank(name)){
queryWrapper.like("name", name);
}
if(ageBegin != null){
queryWrapper.ge("age", ageBegin);
}
if(ageEnd !=null){
queryWrapper.le("age", ageEnd);
}
// SELECT id,name,age,email FROM t_user WHERE (age >= ? AND age <= ?)
List<User> userList = userMapper.selectList(queryWrapper);QueryWrapper各方法中的boolean类型参数
1
2
3
4
5
6
7
8
9// String name = "";
// Integer ageBegin = 20;
// Integer ageEnd = 30;
QueryWrapper<User> queryWrapper = new QueryWrapper<>();
queryWrapper.like(StringUtils.isNotBlank(name), "name", "a")
.ge(ageBegin != null, "age", 20)
.le(ageEnd != null, "age", 30);
// SELECT id,name,age,email FROM t_user WHERE (age >= ? AND age <= ?)
List<User> userList = userMapper.selectList(queryWrapper);
LambdaQueryWrapper
1 | // String name = ""; |
LambdaUpdateWrapper
1 | // 将用户名中包含有a且(年龄大于20或邮箱为null)的用户名修改为小红 |
插件
分页插件
添加配置类
1
2
3
4
5
6
7
8
9
10
11
// 扫描mapper接口所在的包,将主程序上的注解移动配置类上
public class MyBatisPlusConfig {
public MybatisPlusInterceptor mybatisPlusInterceptor(){
MybatisPlusInterceptor mybatisPlusInterceptor = new MybatisPlusInterceptor();
mybatisPlusInterceptor.addInnerInterceptor(new PaginationInnerInterceptor(DbType.MYSQL));
return mybatisPlusInterceptor;
}
}测试
1
2
3
4
5
6
7
8Page<User> page = new Page<>(1, 3);
// SELECT id,name,age,email FROM t_user LIMIT ?
userMapper.selectPage(page, null);
System.out.println(page.getRecords());
System.out.println(page.getPages());
System.out.println(page.getTotal());
System.out.println(page.hasNext());
System.out.println(page.hasPrevious());
自定义分页功能
1 | /** |
1 | <!-- Page<User> selectPageVo(@Param("page") Page<User> page,@Param("age") Integer age); --> |
乐观锁插件
模拟修改冲突
商品表
1
2
3
4
5
6
7
8CREATE TABLE t_product
(
id BIGINT(20) NOT NULL COMMENT '主键ID',
NAME VARCHAR(30) NULL DEFAULT NULL COMMENT '商品名称',
price INT(11) DEFAULT 0 COMMENT '价格',
VERSION INT(11) DEFAULT 0 COMMENT '乐观锁版本号',
PRIMARY KEY (id)
);添加数据
1
INSERT INTO t_product (id, NAME, price) VALUES (1, '外星人笔记本', 100);
添加实体
1
2
3
4
5
6
7
public class Product {
private Long id;
private String name;
private Integer price;
private Integer version;
}添加mapper
1
2public interface ProductMapper extends BaseMapper<Product> {
}测试
1
2
3
4
5
6
7
8
9
10
11
12
13
14
15
16
17
18
19
20
21
public void testConcurrentUpdate() {
//1、小李
Product p1 = productMapper.selectById(1L);
System.out.println("小李取出的价格:" + p1.getPrice());
//2、小王
Product p2 = productMapper.selectById(1L);
System.out.println("小王取出的价格:" + p2.getPrice());
//3、小李将价格加了50元,存入了数据库
p1.setPrice(p1.getPrice() + 50);
int result1 = productMapper.updateById(p1);
System.out.println("小李修改结果:" + result1);
//4、小王将商品减了30元,存入了数据库
p2.setPrice(p2.getPrice() - 30);
int result2 = productMapper.updateById(p2);
System.out.println("小王修改结果:" + result2);
//最后的结果
Product p3 = productMapper.selectById(1L);
//价格覆盖,最后的结果:70
System.out.println("最后的结果:" + p3.getPrice());
}乐观锁实现流程
数据库中添加version字段,取记录时,获取当前version
1
SELECT id,`name`,price,`version` FROM product WHERE id=1
更新时,version+1,如果version版本不对则更新失败
1
2UPDATE product SET price=price+50, `version`=`version` + 1 WHERE id=1 AND
`version`=1
MyBatisPlus-乐观锁插件
修改实体类
1
2
3
4
5
6
7
8
9
public class Product {
private Long id;
private String name;
private Integer price;
// 标识乐观锁版本号字段
private Integer version;
}配置类配置
1
2
3
4
5
6
7
8
9
10
11
public class MyBatisPlusConfig {
public MybatisPlusInterceptor mybatisPlusInterceptor(){
MybatisPlusInterceptor mybatisPlusInterceptor = new MybatisPlusInterceptor();
mybatisPlusInterceptor.addInnerInterceptor(new PaginationInnerInterceptor(DbType.MYSQL));
mybatisPlusInterceptor.addInnerInterceptor(new OptimisticLockerInnerInterceptor());
return mybatisPlusInterceptor;
}
}测试
1
2
3
4
5
6
7
8
9
10
11
12
13
14
15
16
17
18
19Product p1 = productMapper.selectById(1L);
System.out.println("小李取出的价格:" + p1.getPrice());
Product p2 = productMapper.selectById(1L);
System.out.println("小王取出的价格:" + p2.getPrice());
p1.setPrice(p1.getPrice() + 50);
int result = productMapper.updateById(p1);
System.out.println("小李修改结果:" + result);
p2.setPrice(p2.getPrice() - 30);
result = productMapper.updateById(p2);
System.out.println("小王修改结果:" + result);
if(result == 0){
p2 = productMapper.selectById(1L);
p2.setPrice(p2.getPrice() - 30);
result = productMapper.updateById(p2);
System.out.println("小王重新修改结果:" + result);
}
// 最后的结果
Product p = productMapper.selectById(1L);
System.out.println("最终价格:" + p.getPrice());
通用枚举
- 表中的有些字段是固定的,例如性别(男或女),此时可以使用MyBatis-Plus的通用枚举来实现
数据库表添加字段gender
创建通用枚举类
1
2
3
4
5
6
7
8
9
10
11
12
13
14
public enum GenderEnum {
MALE(1, "男"),
FEMALE(2, "女");
// 将注解所标识的属性的值存储到数据库中
private Integer gender;
private String genderName;
GenderEnum(Integer gender, String genderName){
this.gender = gender;
this.genderName = genderName;
}
}修改实体类
1
2
3
4
5
6
7
8
9
10
11
public class User {
private Long id;
private String name;
private Integer age;
private String email;
private GenderEnum gender;
}配置扫描通用枚举
1
2
3
4
5
6
7
8
9
10
11
12
13
14
15
16
17
18
19
20
21
22
23
24
25spring:
# 配置数据源
datasource:
type: com.zaxxer.hikari.HikariDataSource
driver-class-name: com.mysql.cj.jdbc.Driver
url: jdbc:mysql://localhost:3306/mybatis_plus?serverTimezone=GMT%2B8&characterEncoding=utf-8&useSSL=false
username: root
password: 123456
# 日志配置
mybatis-plus:
configuration:
log-impl: org.apache.ibatis.logging.stdout.StdOutImpl
# 自定义mapper路径,默认是classpath*:/mapper/**/*.xml
# mapper-locations:
# global-config:
# db-config:
# # 设置所有表的固定前缀
# table-prefix: t_
# 全局配置id生成策略
# id-type: auto
# 设置类型别名
type-aliases-package: com.zephon.mybatisplus.mybatisplus.pojo
# 配置扫描通用枚举类
type-enums-package: com.zephon.mybatisplus.mybatisplus.enums测试
1
2
3
4// ==> Preparing: INSERT INTO t_user ( id, name, age, gender ) VALUES ( ?, ?, ?, ? )
// ==> Parameters: 1556837238146031618(Long), admin(String), 33(Integer), 1(Integer)
int result = userMapper.insert(new User(null, "admin", 33, null, GenderEnum.MALE));
System.out.println("result:"+result);
代码生成器
引入依赖
1
2
3
4
5
6
7
8
9
10
11<!-- 代码生成器 -->
<dependency>
<groupId>com.baomidou</groupId>
<artifactId>mybatis-plus-generator</artifactId>
<version>3.5.1</version>
</dependency>
<dependency>
<groupId>org.freemarker</groupId>
<artifactId>freemarker</artifactId>
<version>2.3.31</version>
</dependency>快速生成
1
2
3
4
5
6
7
8
9
10
11
12
13
14
15
16
17
18
19
20
21
22
23
24public class FastAutoGeneratorTest {
public static void main(String[] args) {
FastAutoGenerator.create("jdbc:mysql://localhost:3306/mybatis_plus?serverTimezone=GMT%2B8&characterEncoding=utf-8&useSSL=false", " root", "123456")
.globalConfig(builder -> {
builder.author("atguigu") // 设置作者
//.enableSwagger() // 开启 swagger 模式
.fileOverride() // 覆盖已生成文件
.outputDir("D://mybatis_plus"); // 指定输出目录
})
.packageConfig(builder -> {
builder.parent("com.zephon") // 设置父包名
.moduleName("mybatisplus") // 设置父包模块名
.pathInfo(Collections.singletonMap(OutputFile.mapperXml, "D://mybatis_plus"));
// 设置mapperXml生成路径
})
.strategyConfig(builder -> {
builder.addInclude("t_user") // 设置需要生成的表名
.addTablePrefix("t_", "c_"); // 设置过滤表前缀
})
.templateEngine(new FreemarkerTemplateEngine()) // 使用Freemarker引擎模板,默认的是Velocity引擎模板
.execute();
}
}
多数据源
- 适用于多种场景:纯粹多库、读写分离、一主多从、混合模式等
- 模拟一个纯粹多库的场景,其它场景也类似
- 场景说明:创建两个库,分别为mybatis_plus与mybatis_plus_1,将mybatis_plus库的product表移动到mybatis_plus_1库,这样每个库一张表,通过一个测试用例分别获取用户数据和商品数据
创建数据库和表
引入依赖
1
2
3
4
5<dependency>
<groupId>com.baomidou</groupId>
<artifactId>dynamic-datasource-spring-boot-starter</artifactId>
<version>3.5.1</version>
</dependency>配置多数据源
1
2
3
4
5
6
7
8
9
10
11
12
13
14
15
16
17
18
19spring:
# 配置数据源
datasource:
dynamic:
# 设置默认的数据源或数据源组,默认值即为master
primary: master
# 严格匹配数据源,默认为false true时未匹配到指定数据源时抛出异常,false时未匹配到则使用默认数据源
strict: false
datasource:
master:
driver-class-name: com.mysql.cj.jdbc.Driver
url: jdbc:mysql://localhost:3306/mybatis_plus?serverTimezone=GMT%2B8&characterEncoding=utf-8&useSSL=false
username: root
password: 123456
slave_1:
driver-class-name: com.mysql.cj.jdbc.Driver
url: jdbc:mysql://localhost:3306/mybatis_plus_1?serverTimezone=GMT%2B8&characterEncoding=utf-8&useSSL=false
username: root
password: 123456创建用户service
1
2
3
4
5
6public interface UserService extends IService<User> {
}
// 指定所操作的数据源
public class UserServiceImpl extends ServiceImpl<UserMapper, User> implements UserService {
}创建商品service
1
2
3
4
5
6public interface ProductService extends IService<Product> {
}
public class ProductServiceImpl extends ServiceImpl<ProductMapper, Product> implements ProductService {
}测试
1
2System.out.println(userService.getById(1L));
System.out.println(productService.getById(1L));
MyBatisX插件
- MyBatisX是一款基于IDEA的快速开发插件,为效率而生
- 官网